Friday 25 September 2009

Multigrain Bread: BBA Challenge

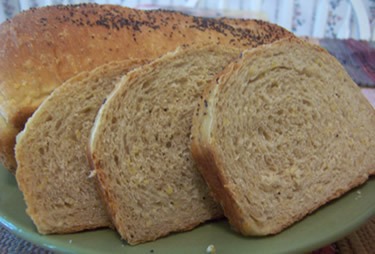
Today we made the 20th bread in the Bread Baker's Apprentice Challenge: Multigrain Bread Extraordinare. This bread definitely lives up to its name. It's a delicious and healthy bread. It tastes great toasted or with just butter. I haven't tried it with PB&J yet, but I'm sure it will taste yummy! It tastes particularly good with citrus marmalade.

This multigrain formula utilizes a soaker that is prepared the night before you plan to make the bread. I used a soaker of polenta, rolled oats, and wheat bran. The formula provides other options for the soaker but these are the ingredients I had readily available so that is what I used. When I make this bread again, I think I'll substitute quinoa or millet for the polenta and possibly buckwheat for the rolled oats. It might be awhile though - we've got 23 more breads to go... Oh dear! So many breads, so little time...

Back to the soaker... It only takes a few minutes to prepare the soaker, then you just leave it on the counter to, well soak. I prepared the soaker before bed, then left it on the counter all night until I was ready to bake the next evening after work. I made the bread in one evening. It's a very easy dough to work with!

multigrain-bread


This is a delicious bread that’s easy to make.  It works well for sandwiches and makes a wonderful toast with butter or jam.  I’ll definitely make this one again.


This bread has been YeastSpotted in the weekly bread roundup hosted by Susan of Wild Yeast.


Happy baking!

Cathy

Sunday 20 September 2009

Pizza Blanco

During the month of September, we've been highlighting different types of pizza. This week in the bread-baking blog, we're featuring Pizza Blanca.

This version of Pizza Blanca is made with a rustic dough and topped with an alfredo-type sauce that (as the name implies) is all white, very cheesy and garlicky. It actually has a heady garlic flavor. I loved the taste and texture of this pizza, but I thought the garlic flavor was a little overpowering. My taste tester loved it!


Pizza Blanco
Makes: 3 pizzas

From A Passion for Baking by Marcy Goldman.

Ingredients:


Pizza Blanca Dough
  • 2 cups warm water
  • 2 teaspoons rapid-rise yeast
  • 1 1/2 cups all-purpose flour
  • 3 tablespoons olive oil
  • 4 teaspoons sugar
  • 1 3/4 teaspoons salt
  • 2 1/2 cups or more bread flour
  • Olive Oil

Pizza Blanca Sauce
  • 2 tablespoons butter
  • 3 tablespoons all-purpose flour
  • 1 cup milk
  • 1/4 teaspoon salt
  • 1/8 teaspoon pepper
  • 1/4 teaspoons garlic powder
  • 1/2 cup grated Parmesan or shredded Harvarti cheese

Pizza Blanca Assembly Ingredients:
  • 12 cloves garlic, crushed
  • Salt and pepper
  • Large shavings of Parmesan cheese
  • Minced fresh basil or oregano

Directions:

In a mixing bowl, whisk together the water and yeast and let it stand 2 to 3 minutes to dissolve yeast. Add all-purpose flour and then briskly whisk in olive oil, sugar, and salt. Add most of the bread flour and stir.
 
Knead to make a soft, slack dough. Knead gently by hand or with a dough hook 5 to 8 minutes on lowest speed of mixer. Dust with more flour if necessary to help the dough hold together. Spray the dough with nonstick cooking spray and cover the bowl with plastic wrap. Let the dough rise 2 to 3 hours until puffy.


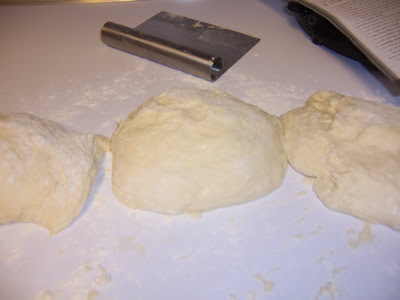
Turn the dough out onto a lightly floured counter and gently deflate. Line baking sheets with parchment paper and drizzle with oil. Divide the dough into three portions and let rest 15 minutes.


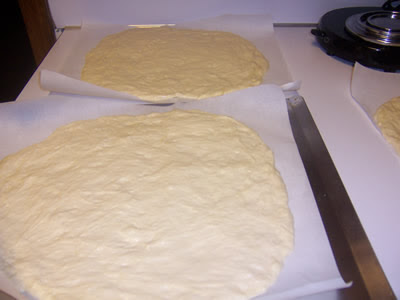
Place the dough on the oiled parchment paper and stretch into 9-to-12-inch rounds. Cover loosely with plastic wrap and let it rise.


Making Pizza Blanca Sauce
In a saucepan, melt butter and then stir in flour. Cook over medium heat 1 minute, stirring constantly. Slowly whisk in milk and cook, stirring until sauce thickens. Stir in salt, pepper, garlic, and cheese.

Assembling the Pizzas
Smear crushed garlic on each pizza. Dust with salt, pepper, and freshly shaved cheese, and herbs. I used fresh basil from my herb garden. Drop dollops of sauce over surface, coating the top. Let the pizzas rise (20 minutes for a crispy crust up to 1 1/2 hours for a more bready crust). I only let them rise for about 20 minutes if that. We were really hungry!


Preheat the oven to 425 to 450 degrees. I used a baking stone.

I started out baking the pizza on the baking sheet as instructed in the recipe but decided partway through the baking to slide the pizza (on the parchment paper) directly onto the stone. I always like this method much better.


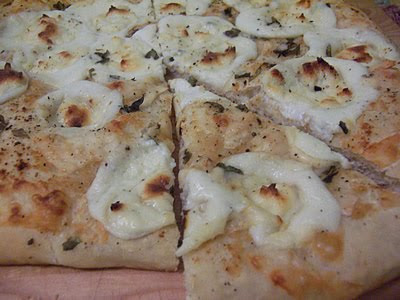
Bake until cheese sizzles on top and edges of pizza are browned, about 10 to 15 minutes. Here is the pizza ready to eat! It tasted great with a salad with caesar dressing.


I liked this pizza so much, I decided to submit it to YeastSpotting, hosted by Susan of Wild Yeast.

My sons weren't to keen on trying the pizza blanca (mainly because it didn't have any meat on it or pizza sauce) so I made their version with pepperoni, onions, and green peppers. They loved their version especially with the rustic dough. You'll just have to imagine what their pizza looked like. They devoured it before I could get a photo. ;)


You might enjoy some of these other Homemade Pizza Recipes
 
Happy Baking!
Cathy


Saturday 19 September 2009

Marbled Rye Bread

Today in the Bread Baker's Apprentice Challenge, we made the 19th bread in the book: Marbled Rye Bread. I wasn't really a big fan of rye bread until I started making it myself. I still prefer breads made with wheat, but I do enjoy a good rye loaf every now and then. Chris at eating is the hard part had mentioned on Twitter that the BBA Rye Loaves were different and would convert me so I was looking forward to trying them. I agree with his assessment. These marbled loaves are beautiful and taste great!

I particularly enjoyed making this rye bread. I thought it might be tricky working with the different colored pieces of dough, but it wasn’t. It was actually very easy! Peter Reinhart simplifies the process of shaping the pieces into batards, then into loaves so it turned out to be a very creative and relaxing process. In addition, this version uses the direct dough method, as opposed to the sourdough method that is generally used for onion rye and deli rye so you can make the bread in an evening if you plan it right.


Some interesting facts about Rye:

Rye is hardier than wheat, resistant to cold, and is the only grain other than wheat that can be used to make leavened bread. It can be made into a sweet or sour loaf. Rye is high in B vitamins, expecially niacin. It contains iron, zinc, and magnesium as well as vitamin E, rutin, antioxidants, and insoluble fiber. It has a bitter-strong, earthy flavor with a pleasant aftertaste. It can be used alone in a loaf or mixed with cornmeal, potato, white flour or whole wheat. Without the addition of wheat flour for body, rye makes a flat, crumbly, and coarse-grained loaf.
You might also enjoy one of these Rye Bread Recipes.


Marbled Rye Bread
Makes: 2 loaves
Adapted from: The Bread Baker's Apprentice by Peter Reinhart 

Marbled Rye Bread is made with a combination of light and dark rye doughs. The formula suggested using white rye flour; however, I didn't have any. I used stone-ground whole grain rye flour instead. Whole grain rye flour makes a more rustic-looking bread rather than the creamy-colored version you get when using white rye flour. However, the whole grain version has more nutrients because it retains the bran and germ; whereas white rye flour has been sifted twice to remove the bran and germ.

I prepared the doughs simultaneously (like an assembly line almost) so that both doughs would rise at about the same time.

Ingredients:

Whole Grain Rye
  • 1 1/2 cups stone-ground whole grain rye flour (or white rye flour)
  • 3 cups unbleached bread flour or clear flour
  • 1 1/2 teaspoons salt
  • 1 3/4 teaspoons instant yeast
  • 1 1/2 teaspoons caraway seeds (optional)
  • 1 tablespoon molasses
  • 2 tablespoons shortening
  • About 1 1/4 cups plus 2 tablespoons water, at room temperature
 
Dark Rye:
  • 1 1/2 cups stone-ground whole grain rye flour (or white rye flour)
  • 3 cups unbleached bread flour or clear flour
  • 1 1/2 teaspoons salt
  • 1 3/4 teaspoons instant yeast
  • 1 1/2 teaspoons caraway seeds (optional)
  • 1 tablespoon molasses
  • 2 tablespoons shortening
  • About 1 1/4 cups plus 2 tablespoons water, at room temperature
  • 1 tablespoon liquid caramel coloring or
  • 2 tablespoons cocoa, carob, or coffee powder dissolved in 2 tablespoons (1 ounce water) (I used cocoa powder)
 
Egg Wash:
  • 1 egg, whisked with 1 teaspoon water until frothy.

Directions:

Preparing the Light Rye Dough:
Stir together the dry ingredients, including the caraway seeds.  Add the molasses, shortening, and the water.  Mix until the dough until it forms a ball. Add additional water if needed. I decided to make this dough by hand, but you can use a mixer if you like.

 
I started out mixing with a spoon but switched to the Danish dough whisk once the dough was too thick to stir with the spoon.

I was able to mix the dough into a ball without adding any extra water. Transfer the dough to a counter sprinkled with a little flour. Knead for 4 minutes by hand. Add sprinkles of flour if necessary.

The dough should feel supple and pliable, a little tacky but not sticky. Transfer the dough to a lightly oiled bowl and roll it around in it to coat it with oil and cover the dough with plastic wrap.


Preparing the Dark Rye Dough:

Stir together the dry ingredients, including the caraway seeds. Add the molasses, shortening, water, and liquid caramel coloring. I used a mixture of cocoa and water for the caramel coloring. When I make this again, I think I'll try coffee granules to make it a little bit darker.  Mix until the dough forms a ball. Add additional water if needed.


Transfer the dough to a counter sprinkled with a little flour. Knead for 4 minutes by hand. Add sprinkles of flour if necessary.


The dough should feel supple and pliable, a little tacky but not sticky. Transfer the dough to a lightly oiled bowl and roll it around in it to coat it with oil.


Fermenting the Doughs:

Ferment both of the doughs at room temperature for about 90 minutes, or until each dough doubles in size. I let my doughs rise for about 2 hours while I was doing other things.

Light rye dough doubled in size.


Dark rye dough doubled in size.


Shaping the Doughs:

Turn the doughs out onto a lightly floured counter and divide and shape them as shown below. (Refer to p. 186 for additional methods of shaping the doughs.)


Divide each dough into 4 even-sized pieces using a dough scraper.


Roll out each piece with a rolling pin into an oblong about 5 inches wide and 8 inches long.


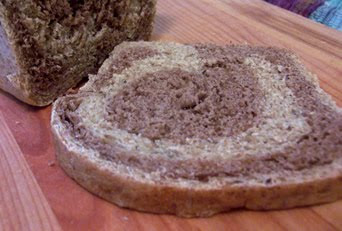
To make a spiral loaf, which is what I chose to do, take a light rye piece and lay a dark rye piece on top, then add a light rye piece, then one more dark rye piece.


Roll this stack up into a batard and seal the bottom.


Repeat with the remaining dough to make 2 loaves. Then, place the doughs in 2 oiled 8 1/2 x 4 1/2-inch loaf pans. You can also bake these loaves freeform on a baking sheet but I wanted a beautiful sandwich loaf so I used loaf pans.


Here is a side view of the spirals. I like the way they look so far.


Proofing the Loaves:

Mist the loaves with spray oil and cover loosely with plastic wrap. Proof at room temperature for 60 to 90 minutes, or until the loaves double in size. It didn't even take an hour before these loaves were double in size. Thank goodness because I was getting tired and ready for bed.


Baking the Loaves:

Preheat the oven to 350 degrees with the oven rack on the middle shelf. Prepare the egg wash by whisking together the egg and water until frothy. Brush the loaves evenly, but gently with the egg wash.


Bake the loaves for approximately 45 minutes. Rotate the loaves after 20 minutes if necessary for even baking. The loaves should make a hollow sound when thumped on the bottom.


The loaves are done when they register 190 degrees on a thermometer.

Remove the loaves immediately from the pan when they have finished baking and let them cool on a wire rack for at least 1 hour, preferably 2 hours, before serving or slicing.


I thumped the loaf on the bottom to see if it sounded hollow. It did! This is another sign that it is done.  I let mine cool for an hour then placed it in a plastic bag until the morning.


The bread was ready for toast in the morning. By the way, it tastes great with the citrus marmalade I made this weekend. I'll be posting about that soon.


Thanks for joining us this week in the Bread Baker's Apprentice Challenge. See you next time...


Happy Baking!
Cathy
Sunday 13 September 2009

Herbed Cheese Pizza: Artisan Bread in 5 Minutes

Today in the bread-baking blog, we're continuing our pizza making series. We're making a delicious Herbed Cheese Pizza using the olive oil dough from Artisan Bread in Five Minutes.

There is a picture of a delicious herbed pizza on the front cover of the September issue of Cooking Light. I've been wanting to make this pizza for a few weeks. I decided to make it using the olive oil dough from Artisan Bread in Five Minutes rather than making the dough from the recipe. I also made homemade pizza sauce using one of my favorite recipes and incorporated some of the additional ingredients from the herbed pizza recipe. I really like the combination. Hopefully, you will too.


Here are some helpful tips and resources for making homemade pizza:


Herbed Cheese Pizza using Olive Oil Dough
 
Make the pizza dough according to the instructions in Artisan Bread in Five Minutes.  Then place the dough in the refrigerator overnight.  You can also use your favorite pizza dough for this recipe.


Preparing the Pizza Sauce and Toppings

I combined a couple of different pizza sauce recipes to make this sauce. It makes a big batch so I froze the rest for another day. I made the sauce Sunday afternoon so we could have pizza for dinner Sunday night.


Pizza Sauce
  • 1 teaspoon olive oil
  • 1 cup finely chopped onion
  • 5 garlic cloves, minced
  • 1/4 cup white wine (I used some white wine that my friend made)
  • 2 tablespoons tomato paste
  • 1 teaspoon dried oregano
  • 1/4 teaspoon freshly ground black pepper
  • 1/2 teaspoon salt
  • 1/2 teaspoon crushed red pepper flakes
  • 1 bay leaf
  • 1 (28-ounce) can crushed tomatoes, undrained. I used fresh tomatoes that another friend of mine gave me. Just peeled them and chopped them up. I had about 32 ounces. Yummy!
  • 1 tablespoon chopped fresh basil (I have fresh basil but used dried instead)
  • 1 teaspoon balsamic vinegar (I used a little more because I like the flavor.)
 

Heat a skillet over medium-high heat. Add 1 teaspoon olive oil to pan. Add onion; sauté 3 minutes or until tender. Add garlic to pan; sauté 30 seconds. Stir in wine; cook 30 seconds. Add tomato paste, oregano, black pepper, salt, crushed red pepper flakes, bay leaf and tomatoes and bring to a boil.

Reduce heat, and simmer for 15 minutes or until thick. Then stir in basil and vinegar and cool. It took about 30 minutes for my sauce to thicken. It also cooked down a good bit.


This makes a chunky sauce so if you prefer a smooth sauce, you can puree it in the blender. I like it either way but my taste tester preferred the sauce smooth so I pureed it and it tasted great.


Herb Topping
  • 2 teaspoons dried oregano
  • 2 teaspoons ground cumin
  • 1 teaspoon hot paprika
  • 1/2 teaspoon coarsely ground black pepper
 

To prepare the topping, combine oregano, cumin, paprika, and 1/2 teaspoon black pepper in a small bowl. Set this aside.

Now it's time to make the pizza...

Twenty minutes before baking time, preheat the oven with a baking stone at 450 degrees F.

Get the dough out of the refrigerator. Dust the surface of the refrigerated dough with flour and cut off a 1-pound piece.

Dust the piece with more flour and quickly shape it into a ball. My dough was really wet so I shaped it on the counter (rather than in my hands) incorporating more flour as I went along.


Flatten the dough with your hands (or a rolling pin if you prefer) to a 1/8-thick round. You may need to use a dough scraper to unstick the dough and keep from adding too much flour. You may also need to let the partially rolled dough sit for a few minutes to "relax" to allow further shaping.


Place the dough on a piece of parchment or you can use a cornmeal-covered pizza peel. I find that the dough sticks to the peel too much with just cornmeal so I like to use parchment paper on top of the peel.


Slide the pizza (on the parchment paper) onto the stone and parbake for a few minutes. This keeps the toppings from making the pizza soggy.  Then top the pizza with some sauce; and the herb mixture;


Finish with slices of your choice of cheese. The recipe suggested kasseri cheese but I couldn't find it so I just used sliced mozzarella.


Slide the pizza onto the baking stone and bake it for 8 to 10 minutes, then check for doneness.  Rotate the pizza if it is browning too much on one side. Then bake for another 5 minutes or until the cheese is bubbly.


Remove the pizza from the oven and allow it to cool slightly before serving. This will give the cheese time to set. I slid mine onto a bread board to let it cool for a few minutes.

Now it's time to enjoy this delicious pizza! It has a wonderful spicy and herb flavor. I think this combination would taste really good with pepperoni but my taste tester is vegetarian so I didn't use any meat. Evenso, it was yummy!


You might enjoy some of these other Homemade Pizza Recipes


Happy Baking!
Cathy

Thursday 10 September 2009

Light Wheat Bread: BBA Challenge

It's Day 18 of the Bread Baker's Apprentice Challenge and we're finally making a bread that includes some whole wheat flour. It's a Light Wheat Bread so it only includes about 33% whole wheat flour, but the combination of bread flour and whole wheat flour should make a fluffy loaf that is great for sandwiches and toasting. Mmmm...I can't wait!
 
I've enjoyed making most of the breads in the challenge so far but I'm excited about this bread because I like to make healthy breads - well relatively healthy in this case. It seems that a lot of you feel the same way since the whole grains section is the most frequently visited section of my site.
 
I'm also excited about this bread because it will go well with the jams I've been making. It just so happens that it's my dad's birthday this week and we're celebrating his birthday tomorrow (Friday) night. I wanted to make him some bread to go with the jam I'm giving him. This formula only makes one loaf so I decided to make two batches. I'm giving one loaf to my dad for his birthday along with some homemade Strawberry Jam - his favorite. I'm keeping the other loaf to enjoy myself. Well, I'll share some with my taste tester, maybe...
 
 
If you're looking for 100% whole wheat bread, check out these whole grain bread recipes.
 
We'll be making a Multigrain Bread in the next couple of weeks and we'll also be making a 100% whole wheat version in the BBA Challenge in the coming weeks so stay tuned. More to come...
 
I used home milled whole wheat flour for this recipe. If you enjoy milling your own grains, check out our Home Milling section for resources and tips for milling your own grains.
 
 
This is an easy bread to make so let's get started.
 

Light Wheat Bread
Makes: 1 medium loaf
From: Peter Reinhardt's Bread Baker's Apprentice
 
Ingredients:
  • 2 1/2 cups unbleached bread flour
  • 1 1/2 cups whole wheat flour
  • 1 1/2 tablespoons granulated sugar or honey
  • 1 1/2 teaspoons salt
  • 3 tablespoons powdered milk
  • 1 1/2 teaspoons instant yeast
  • 2 tablespoons shortening or unsalted butter, at room temperature
  • 1 1/4 cups water, at room temperature

Directions:

Stir together the dry ingredients in a bowl or the bowl of your electric mixer. Add the shortening, honey, and water.  Mix on low speed until the ingredients form a ball. The dough should feel soft and supple.


Transfer the dough to a counter sprinkled with flour and begin kneading or mixing using the dough hook. Add more flour if necessary to make a dough that is tacky but not sticky. This should take about 10 minutes by hand or 6 minutes by machine. I started out mixing with the mixer but decided to knead it some by hand as well.


Transfer the dough to a lightly oiled large bowl and roll it around to coat it with oil. Cover the bowl with plastic wrap and let the dough ferment at room temperature for 1 1/2 to 2 hours, or until the dough doubles in size.


Remove the dough from the bowl and press it by hand into a rectangle about 3/4 inch thick, 6 inches wide and 8 to 10 inches long.


Form it into a loaf by rolling the dough up and pinching the seams with the side of your hand. You can also refer to the detailed instructions in the post on Anadama Bread.


Place the loaf in a lightly oiled 8 1/2 by 4 1/2-inch bread pan. Mist the top with spray oil and loosely cover with plastic wrap.


Let the loaf proof at room temperature for about 90 minutes, or until the dough crests above the lip of the pan.


Preheat the oven to 350 degrees F. and place the oven rack on the middle shelf. Place the loaf pan on a sheet pan and bake for 30 minutes. Rotate the pan 180 degrees to make sure it bakes evenly. Continue baking for 15 to 30 minutes depending on the oven. The finished loaf should be golden brown on the top and the sides, and sound hollow when thumped on the bottom.


Once the bread is finished baking, remove it immediately from the loaf pan and cool it on a wire rack for at least 1 hour before slicing or serving.


This bread was so easy I decided to make another loaf. I made both loaves the same night. Now that's what I call easy!


I had a peanut butter and homemade peach jam sandwich using this bread. It was delicious!
 
Store the bread in a plastic bag on the counter. It will keep for several days. Or, you can freeze it in an airtight freezer bag for a few months.


Thanks for joining us this week in the Bread Baker's Apprentice Challenge. See you next time...


Happy Baking!
Cathy