Tuesday 1 December 2009

Potato Rosemary Bread: BBA

For Day #28 in the BBA Challenge, we made Potato Rosemary Bread. Mmmm...just the thought of this combination makes me drool.  If you're looking for a good use for leftover mashed potatoes, this is about as good as it gets.  This bread goes really well with leftover turkey and dressing and I imagine with most anything especially Italian food.

I've really been looking forward to making this bread. I love that it has fresh rosemary in it. I started growing my own herbs this year in my container garden so it was particularly satisfying to be able to use fresh rosemary that I picked from my garden. Now, I just need to keep the herbs alive through the winter.

Potato Rosemary Bread
Makes: Two 1-pound loaves or 18 dinner rolls
Recipe can be found here
 

Paul, from Yumarama Artisan Bread Blog, made this bread a couple of weeks ago and posted a link to some helpful instructions from King Arthur Flour on how to roast a garlic for the most effective flavor and highest yield.  You might enjoy these instructions as well. 

Eventhough the formula states that the roasted garlic is optional, you don't want to skip it.  The aroma is heavenly - not to mention the flavor it adds to the bread.


Making the Biga (refer to page 107)

For detailed instructions on making the biga, refer to the Italian Bread post.  The potato rosemary loaves only use 7 ounces (or 1 1/4 cups) of the biga so you should have enough left over to make Pugliese, the next bread in the BBA Challenge.

Mixing the Dough

Remove the biga from the refrigerator 1 hour before you plan to make the bread and cut it into about 10 small pieces. Cover the pieces with plastic wrap and let them sit to take off the chill.


Stir (or mix) together the flour, salt, black pepper, and yeast.  Add the biga pieces, mashed potatoes, oil, rosemary, and water.


Stir this mixture for 1 minute, or until the ingredients form a ball.  Add more water or flour as necessary.


Kneading the Dough

Transfer the dough to a counter sprinkled with flour and knead for about 10 minutes until the dough is soft and supple.  It should be tacky but not sticky.


Flatten the dough and spread the roasted garlic over the top.


Gather the dough into a ball, dust with a little flour and knead it by hand for 1 minute.


Fermenting the Dough

Lightly oil a large bowl and transfer the dough to the bowl.  Roll it around to coat it with oil. Cover the bowl with plastic wrap.


Ferment the dough at room temperature for about 2 hours, or until the dough doubles in size.


Shaping the Loaves

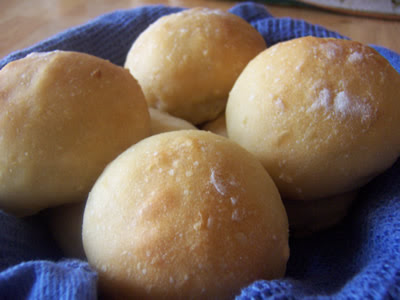
Remove the dough and divide it into 2 equal pieces if you're making loaves or 18 equal pieces if you want to make dinner rolls.  I opted to make two yummy loaves.


Shape each piece into a boule (refer to page 72).


Line a baking sheet with parchment paper and sprinkle with cornmeal.  Place the dough on the parchment and make sure the boules are separated so they will not touch even after they rise.


Proofing the Loaves

Mist the dough with spray oil and cover loosely with plastic wrap. Proof at room temperature for 1 to 2 hours, or until the dough doubles in size.


Baking the Loaves

Preheat the oven to 400 degrees with the oven rack on the middle shelf.  Remove the plastic wrap and lightly brush the loaves with olive oil. You don't need to score the loaves but you can if you like.  I decided to score one loaf and leave the other unscored just to see the difference.


Place the pan in the oven and bake the loaves for 20 minutes, then rotate the pan 180 degrees for even baking.  It will take about 35 to 45 minutes to bake the loaves completely.
 
Rotate the pans after 10 more minutes, then repeat until the loaves are a rich golden brown all over.  The loaves should sound hollow when thumped on the bottom.


If the loaves are fully colored but appear to be too soft, turn the oven off and let them bake an additional 5 to 10 minutes longer to firm up.  My loaves were browning a little too soon so I turned the oven off.  It worked great!

Remove the finished loaves from the oven and let them cool on a wire rack for at least 1 hour before serving.


This is the hard part.  These loaves smell so good you want to eat them right away.  However, my taste tester and I refrained from eating them before they cooled.  We decided to go see some Christmas lights while we were waiting on the loaves to cool.

When we got back, the loaves were ready to eat.  We dipped them in olive oil with freshly ground black pepper.  Mmmmm....delicious!


Thanks for joining us this week in the Bread Baker's Apprentice Challenge. The next bread in Bread Baker's Apprentice Challenge is Pugliese (page 222 in the Bread Baker's Apprentice.). This bread also uses a biga and mashed potatoes.


Happy Baking!
Cathy


Sunday 29 November 2009

Potato Rolls

I hosted my family's Thanksgiving dinner this year and it turned out to be a big event.  To make things a little easier on myself, I opted for rolls that could be prepared ahead of time. I thought about making brown and serve rolls or refrigerator rolls the day before, but there's not much room in my refrigerator the day before because the turkey has to brine for 12 to 24 hours.  I needed to find a different option.

Well, I found just the ticket - Potato Rolls!  These rolls can be made up to a month in advance and frozen until ready to serve.  When you're ready to serve them, all you have to do is thaw the rolls completely, and reheat them in foil until warm. I have an extra freezer so this turned out to be the better option. Making the rolls a few days ahead of time freed me up to do other things Thanksgiving morning and freed up space in my refrigerator.  That's what I call a win-win! 

These rolls were such a big help and a big hit that I decided to share them with you.  I hope you enjoy them as much as we do.  I'll definitely be making them again.

Potato Rolls
Recipe from Cooking Light
Makes: 24 Rolls


Directions:

Place potato in a medium saucepan; cover with water. Bring to a boil. Reduce heat; simmer 15 minutes or until tender. Drain in a colander over a bowl, reserving 1 cup cooking liquid. Mash potatoes with a fork. Cool reserved cooking liquid to 105° to 115°. Stir in 1 teaspoon sugar and yeast. Let stand 5 minutes.


You could use leftover mashed potatoes for this recipe, but then you wouldn't have the reserved potato water.


Lightly spoon 4 1/4 cups flour into dry measuring cups; level with a knife. Combine mashed potato, yeast mixture, 1 tablespoon sugar, 4 cups flour, butter, salt, and egg in a large bowl, stirring until well blended.


Turn dough out onto a floured surface. Knead until smooth and elastic (about 10 minutes); add up to 1/4 cup flour, 1 tablespoon at a time, to prevent dough from sticking to hands (dough will feel tacky).  Place dough in a large bowl coated with cooking spray, turning to coat top.


Cover and let rise in a warm place (85°), free from drafts, 45 minutes or until doubled in size. (Press two fingers into dough. If indentation remains, the dough has risen enough.) Punch dough down; cover and let rest 10 minutes.


Divide dough in half; divide each half into 12 equal portions.


Working with 1 portion at a time (cover remaining dough to keep from drying), shape portion into a 2-inch-long oval on a floured surface.


Roll up tightly, starting with a long edge, pressing firmly to eliminate air pockets; pinch seam and ends to seal.


Place roll, seam side down, on a baking sheet coated with cooking spray.  Repeat procedure with remaining dough portions, placing 12 rolls on each of 2 baking sheets.  Sift 2 tablespoons flour over rolls to lightly coat.


Cover rolls and let rise 45 minutes or until doubled in size.


Bake at 350° for 10 minutes with 1 baking sheet on the bottom rack and 1 baking sheet on the second rack from the top.


Rotate baking sheets; bake an additional 10 minutes or until rolls are browned on bottom, lightly browned on top, and sound hollow when tapped. Remove from pan; cool on wire racks.


Then, the day you want to eat them, just reheat them and enjoy.


You might also enjoy using the leftover rolls to make miniature sandwiches with any leftover turkey.  That's what we did and the sandwiches were really delicious!


Thanks for visiting The Bread Experience Bread-Baking Blog.

Happy Baking!
Cathy

Monday 23 November 2009

Cinnamon Pumpkin Crescent Rolls - HBinFive

Today in the bread-baking blog, we're featuring Cinnamon Pumpkin Crescent Rolls made with Healthy Bread in Five Minutes Pumpkin Pie Brioche dough! These rolls are excellent!  They are a healthier alternative to canned cinnamon rolls because they're made with 40% whole wheat flour.  These cinnamon crescent rolls would make a great dessert for your Holiday meal (or any meal for that matter).
 
One of the things I like about the Healthy Bread in Five Minutes' method is that you can prepare the dough ahead of time and it will last for several days in the refrigerator.  So, all you have to do when you want to bake bread, is take the dough out of the refrigerator, cut off the amount you need, shape it into the type of bread you want to make, let is rise, then bake it. How easy is that?
 
I also think the Pumpkin Pie Brioche dough would work well for savory pumpkin crescent rolls. Just follow the instructions for the cinnamon version but leave off the cinnamon sugar mixture and the icing.  I made a similar version last year.  Here is the recipe and instructions for making savory Pumpkin Crescent Rolls.


Cinnamon Pumpkin Crescent Rolls

Made with Healthy Bread in Five Minutes Pumpkin Pie Brioche dough
 
Ingredients:
  • Pumpkin Pie Brioche Dough (I used about 1 1/2 pounds of dough)
  • Cinnamon sugar
  • Egg (for egg wash if desired)
  • Raw sugar (for sprinkling on top if desired)
  • Powdered Sugar Glaze (optional)
 

Directions:
 
To make these crescent rolls, just cut off the amount of dough you need from the dough you have stored in the refrigerator. I had saved 1 1/2 pounds for the rolls so I just used the rest of the dough.
 
Dust the dough with flour and shape it into a ball.


The book states to roll out the dough until it is a 1/8-inch thick rectangle and use enough flour to prevent the dough from sticking to th work surface.  However, 1/8-inch thick is a little bit too thin.  I ended up rolling out the dough (and shaping it back into a ball) a few times because each time I rolled it out, it stuck to the counter.


Spread the cinnamon-sugar mixture evenly over the dough.


Cut the dough into 8 smaller rectangles by making 3 evenly spaced cuts along the length of the dough.


Then cut the dough in half along the short end.


Cut the 8 rectangles into 2 triangles each.


Roll the dough starting at the thicker end, until the point is tucked under the bottom.  Curve the ends to create the crescent shape and place on a greased baking pan.  This part was a little bit tricky.  The dough was still sticking to the counter so I was focusing on shaping and didn't get photos of this process.


Cover the rolls loosely with plastic wrap and let them rest about 40 minutes.
 
 
Preheat the oven to 350 degrees and place the rack in the center of the oven.

At this point, you can brush the tops of the rolls with an egg wash and sprinkle with raw sugar but I decided to leave them plain until after they were baked. Bake the rolls about 20 to 25 minutes, until golden brown and well set in center.


Remove the crescents from the oven and let them cool on a wire rack.

 
I didn't have any cream cheese to make the icing listed in the book so I made a powdered sugar glaze flavored with lemon extract.

Powdered Sugar Glaze:
  • 4 cups Powdered Sugar
  • 1 teaspoon lemon or orange extract
  • 6 tablespoons to 1/2 cup of warm milk.

Sift 4 cups of powdered sugar into a bowl.  Add 1 teaspoon of lemon or orange extract and 6 tablespoons to 1/2 cup of warm milk, briskly whisking until all of the sugar is dissolved.  Add the milk slowly and only as much as is needed to make a thick, smooth paste.

Drizzle the powdered-sugar glaze over the tops of the crescent rolls by dipping the tines of a fork or whisk into the glaze and waving the fork over the tops.
 
Enjoy!!!!


Thanks for visiting The Bread Experience Bread-Baking Blog.


Happy Baking!
Cathy
 

Here are some other Pumpkin Bread Recipes and Roll Recipes for your holiday bread-baking enjoyment.

Sunday 22 November 2009

Portuguese Sweet Bread: BBA

Today in the bread-baking blog, we're making Bread #27 - Portuguese Sweet Bread.  This dough is so flavorful, I wanted to make cookies out of it instead of bread.  It uses some of the same flavorings that my favorite Holiday sugar cookie recipe uses, but it's an enriched yeast bread.  Delicious!  I loved making this bread but it took all day and most of the evening to do it.  Don't let that scare you - most of the time is spent fermenting and proofing the dough, so it really is just a matter of timing. If you plan to make this bread, be sure to start early in the day. It's definitely worth it!

It just so happens, that the  Artisan Bread Baker's Group chose Portuguese Sweet Bread for the Bread of the Month this month. That worked out great since I was already planning on making it for the BBA Challenge. I like it when that happens!  The Bread of the Month virtual bread-baking party started at the beginning of November and runs through the end of the month so you still have time to bake this delicious bread. Click here for details.

Portuguese Sweet Bread
Makes: 2 Loaves


Recipe found on page 215 of the Bread Baker's Apprentice by Peter Reinhart.

Ingredients:

Sponge

  • 1/2 cup (2.25 ounces or 64g) unbleached bread flour
  • 1 T. (.5 ounce or 14.18g) granulated sugar
  • 2 1/4 tsp. (.25 ounce or 7.08g) instant yeast
  • 1/2 cup (4 ounces or 114g) water, at room temperature

Dough

  • 6 T. (3 ounces or 83g) granulated sugar
  • 1 tsp. (.25 ounce or 7.08g) salt
  • 1/4 cup (1.25 ounces or 35.44g) powdered milk
  • 2 T. (1 ounce or 28g) unsalted butter, at room temperature
  • 2 T. (1 ounce or 28g) vegetable shortening
  • 2 large (or 94g) eggs
  • 1 tsp. (.17 ounce or 5g or 5ml) lemon extract
  • 1 tsp. (.17 ounce or 5g or 5ml) orange extract
  • 1 tsp. (.17 ounceor 5g or 5ml) vanilla extract
  • 3 cups (13.5 ounces or 382g) unbleached bread flour
  • Up to 6 T. (3 ounces or 84g) water, at room temp

Egg Wash

  • 1 egg, whisked with 1 tsp. water until frothy

Directions:

Making the Sponge
Make a sponge by stirring together the flour, sugar, and yeast in a bowl. Then add the water and stir until all the ingredients are hydrated and make a smooth batter. Cover the bowl with plastic wrap and let the dough ferment at room temperature for 60 to 90 minutes, or until the sponge gets foamy and seems on the verge of collapse.


Making the Dough

To make the dough, combine the sugar, salt, powdered milk, butter, and shortening in a large mixing bowl or in the bowl of your electric mixer. 


Mix in the sponge and the flour.  Add water as necessary to make a very soft dough.


Kneading the Dough

Knead the dough by hand or use the dough hook on your mixer.  I decided to knead it by hand.  I don't like to miss out on this part.


The finished dough will be very supple and soft, easy to knead, and not wet or sticky.  In other words, perfect!  It will take about 15 minutes to achieve the right consistency. This is because dough with high amounts of fat and sugar takes longer to develop the gluten.


Fermenting the Dough
Lightly oil a larger bowl and transfer the dough to the bowl. Roll it around to coat it with oil and cover the bowl with plastic wrap.  Ferment the dough at room temperature for 2 hours, or until the dough doubles in size.


Shaping the Boules
Remove the dough from the bowl and divide it into 2 equal pieces.


Form each piece into a boule (refer to page 72).


Lightly oil two 9-inch pie pans and place 1 boule, seam side down, in each pan.


Proofing the Loaves

Mist the dough with spray oil and loosely cover with plastic wrap. Proof the loaves at room temperature for 2 to 3 hours, or until the dough fills the pans fully, doubling in size and overlapping the edges slightly.  I proofed my dough for 7 hours and it still didn't completely fill the pan but I decided to bake it anyway at this point.


See that little dent in the left side of the loaf?  I dropped the extract bottle on it.  Don't ask!


Gently brush the loaves with egg wash.   Preheat the oven to 350 degrees F with the oven rack on the middle shelf.


Baking the Loaves
Bake the loaves for 50 to 60 minutes. After about 30 minutes, check the loaves and if necessary, rotate 180 degrees for even baking. Due to the high amount of sugar, the dough will brown very quickly.  It will get darker as the center gradually heats through, but it will (should) not burn.


The final color will be a rich mahogany brown.


Cooling and Serving the Loaves

Remove the bread from the pans and place on a wire rack to cool. The bread will soften as it cools and will become a very soft, squishy loaf.  Let it cool for at least 90 minutes before slicing or serving.  Man, that's the hardest part!

Here is the cooled and sliced loaf.  Delicious!


Thanks for joining us this week in the Bread Baker's Apprentice Challenge.

The next bread in Bread Baker's Apprentice Challenge is Potato Rosemary Bread (page 219 in the Bread Baker's Apprentice). I'm looking forward to making this flavorful and delicious bread.


Happy Baking!
Cathy